前言
重新梳理一下,当新开一台vps,或者打算重新配置vps环境的流程。仅做个人备份。
一、重装系统
1.1 dd重装前的准备
#Debian/Ubuntu:
apt-get update
apt-get install -y xz-utils openssl gawk file

#RedHat/CentOS:
yum update
yum install -y xz openssl gawk file
1.2 dd重装系统
1.2.1 @coobar大佬的傻瓜式一键DD脚本(Linux+Windows)
##镜像文件在OneDrive
wget -N --no-check-certificate https://raw.githubusercontent.com/veip007/dd/master/dd-od.sh && chmod +x dd-od.sh && ./dd-od.sh

##镜像文件在GoogleDrive
wget -N --no-check-certificate https://raw.githubusercontent.com/veip007/dd/master/dd-gd.sh && chmod +x dd-gd.sh && ./dd-gd.sh
1.2.2 @dansnow大佬的究极一键重装系统脚本(Linux)
wget --no-check-certificate -O AutoReinstall.sh https://git.io/AutoReinstall.sh && bash AutoReinstall.sh
1.2.3 @Vicer大佬的重装脚本(Linux+Windows)
CentOS 7
wget --no-check-certificate -qO InstallNET.sh 'https://moeclub.org/attachment/LinuxShell/InstallNET.sh' && bash InstallNET.sh -dd 'https://gd.boilog.com/0:/Mirror/dd/cxthhhhh/CentOS_7.X_NetInstallation.vhd.gz'
CentOS 8
wget --no-check-certificate -qO InstallNET.sh 'https://moeclub.org/attachment/LinuxShell/InstallNET.sh' && bash InstallNET.sh -dd 'https://gd.boilog.com/0:/Mirror/dd/cxthhhhh/CentOS_8.X_NetInstallation.vhd.gz'
备注:
- CentOS7/8镜像由@MeowLove大佬制作
- 用户:root 密码:cxthhhhh.com
Debian
wget https://moeclub.org/attachment/LinuxShell/InstallNET.sh
chmod a+x InstallNET.sh
#Debian 9
bash InstallNET.sh -d 9 -v 64 -a --mirror 'http://mirrors.ustc.edu.cn/debian/'
#Debian 10
bash InstallNET.sh -d 10 -v 64 -a --mirror 'http://mirrors.ustc.edu.cn/debian/'
备注:
- 用户:root 密码: MoeClub.org
Usage:
        bash InstallNET.sh      -d/--debian [dist-name]
                                -u/--ubuntu [dist-name]
                                -c/--centos [dist-version]
                                -v/--ver [32/i386|64/amd64]
                                --ip-addr/--ip-gate/--ip-mask
                                -apt/-yum/--mirror
                                -dd/--image
                                -a/-m
# dist-name: 发行版本代号
# dist-version: 发行版本号
# -apt/-yum/--mirror : 使用定义镜像
# -a/-m : 询问是否能进入VNC自行操作. -a 为不提示(一般用于全自动安装), -m 为提示.
##使用默认镜像全自动安装
bash InstallNET.sh -d 8 -v 64 -a

#使用自定义镜像全自动安装
bash InstallNET.sh -c 6.10 -v 64 -a --mirror 'http://mirror.centos.org/centos'

# 以下示例中,将X.X.X.X替换为自己的网络参数.
# --ip-addr :IP Address/IP地址
# --ip-gate :Gateway   /网关
# --ip-mask :Netmask   /子网掩码

#使用自定义镜像全自动安装
#bash InstallNET.sh -u 9 -v 64 -a --mirror 'http://mirrors.ustc.edu.cn/debian/'

#使用自定义镜像自定义网络参数全自动安装
#bash InstallNET.sh -u 16.04 -v 64 -a --ip-addr x.x.x.x --ip-gate x.x.x.x --ip-mask x.x.x.x --mirror 'http://archive.ubuntu.com/ubuntu'

#使用自定义网络参数全自动dd方式安装
#bash InstallNET.sh --ip-addr x.x.x.x --ip-gate x.x.x.x --ip-mask x.x.x.x -dd 'https://moeclub.org/onedrive/IMAGE/Windows/win7emb_x86.tar.gz'

#使用自定义网络参数全自动dd方式安装存储在谷歌网盘中的镜像(调用文件ID的方式)
#bash InstallNET.sh --ip-addr x.x.x.x --ip-gate x.x.x.x --ip-mask x.x.x.x -dd "https://image.moeclub.org/GoogleDrive/1cqVl2wSGx92UTdhOxU9pW3wJgmvZMT_J"

#使用自定义网络参数全自动dd方式安装存储在谷歌网盘中的镜像
#bash InstallNET.sh --ip-addr x.x.x.x --ip-gate x.x.x.x --ip-mask x.x.x.x -dd "https://image.moeclub.org/GoogleDrive/1cqVl2wSGx92UTdhOxU9pW3wJgmvZMT_J"

#国内推荐使用USTC源
#--mirror 'http://mirrors.ustc.edu.cn/debian/'

#可用镜像地址
# 推荐使用带有 /GoogleDrive/ 链接, 速度更快.
# 当然也可以使用自己GoogleDrive中储存的镜像,使用方式:
  https://image.moeclub.org/GoogleDrive/

# win7emb_x86.tar.gz:
  https://image.moeclub.org/GoogleDrive/1srhylymTjYS-Ky8uLw4R6LCWfAo1F3s7
  https://moeclub.org/onedrive/IMAGE/Windows/win7emb_x86.tar.gz

# win8.1emb_x64.tar.gz:
  https://image.moeclub.org/GoogleDrive/1cqVl2wSGx92UTdhOxU9pW3wJgmvZMT_J
  https://moeclub.org/onedrive/IMAGE/Windows/win8.1emb_x64.tar.gz

# win10ltsc_x64.tar.gz:
  https://image.moeclub.org/GoogleDrive/1OVA3t-ZI2arkM4E4gKvofcBN9aoVdneh
  https://moeclub.org/onedrive/IMAGE/Windows/win10ltsc_x64.tar.gz
#说明
#全自动安装默认root密码: MoeClub.org,安装完成后请立即更改密码
#远程登陆账号为: Administrator,远程登陆密码为: Vicer
#建议通过加参数 -p 密码 的方式自定义密码
1.3 dd完成修改root密码
passwd root
按提示操作输入新密码,输两次,注意不会显示出来的。
二、配置vps
2.1 切换中文环境
切换中文环境操作,重连vps后生效。
#主机博客博主写的脚本
wget -N --no-check-certificate https://raw.githubusercontent.com/FunctionClub/LocaleCN/master/LocaleCN.sh && bash LocaleCN.sh
2.2 安装bbr/bbr2/锐速加速
#悟雨大佬的bbr2/bbr/锐速脚本合集
##不卸载原内核版本:
wget -N --no-check-certificate "https://github.000060000.xyz/tcpx.sh" && chmod +x tcpx.sh && ./tcpx.sh
##或
wget -N "https://github.000060000.xyz/tcpx.sh" && chmod +x tcpx.sh && ./tcpx.sh
##卸载原内核版本:
wget -N --no-check-certificate "https://github.000060000.xyz/tcp.sh" && chmod +x tcp.sh && ./tcp.sh
##或
wget -N "https://github.000060000.xyz/tcp.sh" && chmod +x tcp.sh && ./tcp.sh
按提示操作安装内核,重启,启用加速。
2.3 安装编译工具包
#RedHat/CentOS:
yum groupinstall "Development Tools"  -y

#Debian/Ubuntu:
apt-get install build-essential -y
2.4 安装Python管理工具pyenv
安装编译环境
#Ubuntu/Debian:
apt-get install -y make build-essential libssl-dev zlib1g-dev libbz2-dev \
libreadline-dev libsqlite3-dev wget curl llvm libncurses5-dev libncursesw5-dev \
xz-utils tk-dev libffi-dev liblzma-dev python-openssl git

#RedHat/CentOS:
yum install -y @development zlib-devel bzip2 bzip2-devel readline-devel sqlite \
sqlite-devel openssl-devel xz xz-devel libffi-devel findutils
创建目录、安装
mkdir ~/.pyenv
git clone git://github.com/yyuu/pyenv.git ~/.pyenv
配置环境变量
echo 'export PYENV_ROOT="$HOME/.pyenv"' >> ~/.bashrc
echo 'export PATH="$PYENV_ROOT/bin:$PATH"' >> ~/.bashrc
echo 'eval "$(pyenv init -)"' >> ~/.bashrc
exec $SHELL -l
列出所有版本
pyenv install --list
安装python 3.8.2
pyenv install 3.8.2
全局使用
pyenv global 3.8.2
检查版本
python --version
三、安全配置
3.1 关闭root,使用ssh key登录
生成ssh key
ssh-keygen -t rsa
终端提示内容与建议如下
Enter file in which to save the key (/root/.ssh/id_rsa): #建议直接回车使用默认路径
Enter passphrase (empty for no passphrase): #输入密码短语(留空则直接回车)
Enter same passphrase again: #重复密码短语
导入KEY文件
cat /root/.ssh/id_rsa.pub >> /root/.ssh/authorized_keys
显示私钥,注意复制粘贴新建文本(无拓展名注意了)另存为id_rsa,utf-8格式,免得关闭root密码登录后进不去了。
cat /root/.ssh/id_rsa
或者直接用xftp、WinSCP等软件直接登陆访问,将/root/.ssh/id_rsa直接拷贝出来。
备注:
/root/.ssh/目录下生成的2个文件,id_rsa为私钥,id_rsa.pub为公钥。私钥注意在本地、本地、本地妥善保存(丢失就进不去服务器咯),安全第一,建议私钥最好从服务器里删除。公钥则可以任意公开。
修改/etc/ssh/sshd_config文件,关闭root密码登录,开启ssh key 认证。
#这是一整条命令,复制到终端运行
cat > /etc/ssh/sshd_config <<EOF
#  $OpenBSD: sshd_config,v 1.103 2018/04/09 20:41:22 tj Exp $

# This is the sshd server system-wide configuration file.  See
# sshd_config(5) for more information.

# This sshd was compiled with PATH=/usr/local/bin:/usr/bin:/usr/local/sbin:/usr/sbin

# The strategy used for options in the default sshd_config shipped with
# OpenSSH is to specify options with their default value where
# possible, but leave them commented.  Uncommented options override the
# default value.

# If you want to change the port on a SELinux system, you have to tell
# SELinux about this change.
# semanage port -a -t ssh_port_t -p tcp #PORTNUMBER
#
#Port 22
#AddressFamily any
#ListenAddress 0.0.0.0
#ListenAddress ::

HostKey /etc/ssh/ssh_host_rsa_key
HostKey /etc/ssh/ssh_host_ecdsa_key
HostKey /etc/ssh/ssh_host_ed25519_key

# Ciphers and keying
#RekeyLimit default none

# System-wide Crypto policy:
# This system is following system-wide crypto policy. The changes to
# Ciphers, MACs, KexAlgoritms and GSSAPIKexAlgorithsm will not have any
# effect here. They will be overridden by command-line options passed on
# the server start up.
# To opt out, uncomment a line with redefinition of  CRYPTO_POLICY=
# variable in  /etc/sysconfig/sshd  to overwrite the policy.
# For more information, see manual page for update-crypto-policies(8).

# Logging
#SyslogFacility AUTH
SyslogFacility AUTHPRIV
#LogLevel INFO

# Authentication:

#LoginGraceTime 2m
PermitRootLogin yes
#StrictModes yes
#MaxAuthTries 6
#MaxSessions 10

#PubkeyAuthentication yes

# The default is to check both .ssh/authorized_keys and .ssh/authorized_keys2
# but this is overridden so installations will only check .ssh/authorized_keys
#AuthorizedKeysFile    .ssh/authorized_keys

#AuthorizedPrincipalsFile none

#AuthorizedKeysCommand none
#AuthorizedKeysCommandUser nobody

# For this to work you will also need host keys in /etc/ssh/ssh_known_hosts
#HostbasedAuthentication no
# Change to yes if you don't trust ~/.ssh/known_hosts for
# HostbasedAuthentication
#IgnoreUserKnownHosts no
# Don't read the user's ~/.rhosts and ~/.shosts files
#IgnoreRhosts yes

# To disable tunneled clear text passwords, change to no here!
#PasswordAuthentication yes
#PermitEmptyPasswords no
#PasswordAuthentication yes

# Change to no to disable s/key passwords
#ChallengeResponseAuthentication yes
ChallengeResponseAuthentication no

# Kerberos options
#KerberosAuthentication no
#KerberosOrLocalPasswd yes
#KerberosTicketCleanup yes
#KerberosGetAFSToken no
#KerberosUseKuserok yes

# GSSAPI options
GSSAPIAuthentication yes
GSSAPICleanupCredentials no
#GSSAPIStrictAcceptorCheck yes
#GSSAPIKeyExchange no
#GSSAPIEnablek5users no

# Set this to 'yes' to enable PAM authentication, account processing,
# and session processing. If this is enabled, PAM authentication will
# be allowed through the ChallengeResponseAuthentication and
# PasswordAuthentication.  Depending on your PAM configuration,
# PAM authentication via ChallengeResponseAuthentication may bypass
# the setting of "PermitRootLogin without-password".
# If you just want the PAM account and session checks to run without
# PAM authentication, then enable this but set PasswordAuthentication
# and ChallengeResponseAuthentication to 'no'.
# WARNING: 'UsePAM no' is not supported in Fedora and may cause several
# problems.
UsePAM yes

#AllowAgentForwarding yes
#AllowTcpForwarding yes
#GatewayPorts no
X11Forwarding yes
#X11DisplayOffset 10
#X11UseLocalhost yes
#PermitTTY yes

# It is recommended to use pam_motd in /etc/pam.d/sshd instead of PrintMotd,
# as it is more configurable and versatile than the built-in version.
PrintMotd no

#PrintLastLog yes
#TCPKeepAlive yes
#PermitUserEnvironment no
#Compression delayed
#ClientAliveInterval 0
#ClientAliveCountMax 3
#UseDNS no
#PidFile /var/run/sshd.pid
#MaxStartups 10:30:100
#PermitTunnel no
#ChrootDirectory none
#VersionAddendum none

# no default banner path
#Banner none

# Accept locale-related environment variables
AcceptEnv LANG LC_CTYPE LC_NUMERIC LC_TIME LC_COLLATE LC_MONETARY LC_MESSAGES
AcceptEnv LC_PAPER LC_NAME LC_ADDRESS LC_TELEPHONE LC_MEASUREMENT
AcceptEnv LC_IDENTIFICATION LC_ALL LANGUAGE
AcceptEnv XMODIFIERS

# override default of no subsystems
Subsystem sftp /usr/libexec/openssh/sftp-server

# Example of overriding settings on a per-user basis
#Match User anoncvs
#  X11Forwarding no
#  AllowTcpForwarding no
#  PermitTTY no
#  ForceCommand cvs server

#禁用root,开启key登陆
#RSAAuthentication yes
AuthorizedKeysFile .ssh/authorized_keys
PubkeyAuthentication yes
PasswordAuthentication no
EOF
备注:
@edisonchen大佬:“RSAAuthentication yes”此项在debian9、ubuntu 18.04、centos7中已经去除该项。所以更新的系统并不需要此项。
修改完成,重启ssh服务。
#CentOS系统
service sshd restart
#Debian/Ubuntu系统
service ssh restart
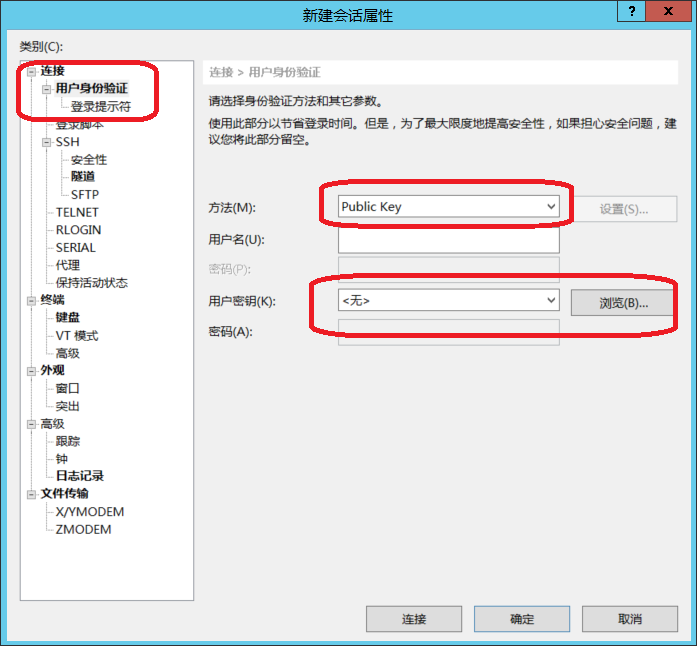
然后以后登陆终端就需要用ssh-key方式登陆了,如图为XShell。
接下来就是安装宝塔面板、改ssh端口、rclone、fail2ban(可以安装宝塔之后在软件商店里选用,可视化操作,也可以康康我之前水的文章)等等什么的了。