前言
之前学习了怎么制作Windows dd包,但到了启动阶段的设置其实是使用虚拟机启动系统然后进行的一些设置。虽然通过dd命令重装系统后不用进行新系统设置,但并不是真正的无人值守。
最近进一步学习了使用自动应答文件来实现无人值守。官方说明写得非常好,可惜脑子表示看不进去OvO
文后提供了我使用的注册表文件和自动应答文件的下载链接。
微软官方的说明文档
- https://docs.microsoft.com/zh-cn/windows-hardware/customize/desktop/wsim/answer-files-overview
- https://docs.microsoft.com/zh-cn/windows-hardware/customize/desktop/unattend/
微软官方的制作工具
Windows ADKhttps://docs.microsoft.com/zh-cn/windows-hardware/get-started/adk-install
最后还是使用第三方工具NTLite制作,简单明了。
1.用注册表调整一些功能
想要Windows dd 包保证在远程连接的时候不出现问题,需要实现做一些调整。
比如:
– 注册表开启远程桌面服务和3389端口
– 关闭 Ctrl+Alt+Del 登陆
详细注册表项:
打开远程桌面服务:
RegKey=”HKEY_LOCAL_MACHINE\SYSTEM\CurrentControlSet\Control\Terminal Server”
Value=”fDenyTSConnections”
Type=”REG_DWORD”
Data=”0″
设置远程桌面端口(16进制值表示d3d:3389):
RegKey=”HKEY_LOCAL_MACHINE\SYSTEM\CurrentControlSet\Control\Terminal Server\Wds\rdpwd\Tds\tcp”
Value=”PortNumber”
Type=”REG_DWORD”
Data=”d3d”
RegKey=”HKEY_LOCAL_MACHINE\SYSTEM\CurrentControlSet\Control\Terminal Server\WinStations\RDP-Tcp”
Value=”PortNumber”
Type=”REG_DWORD”
Data=”d3d”
不验证用户级别:
RegKey=”HKEY_LOCAL_MACHINE\SYSTEM\CurrentControlSet\Control\Terminal Server\WinStations\RDP-Tcp”
Value=”UserAuthentication”
Type=”REG_DWORD”
Data=”0″
新建防火墙规则:打开3389端口:
RegKey=”HKEY_LOCAL_MACHINE\SYSTEM\CurrentControlSet\Services\SharedAccess\Parameters\FirewallPolicy\FirewallRules”
Value=”{33893389-3389-3389-3389-338933893389}”
Type=”REG_SZ”
Data=”v2.10|Action=Allow|Active=TRUE|Dir=In|Protocol=6|LPort=3389|Name=3389|”
关闭 Ctrl+Alt+Del 登陆:
RegKey=”HKEY_LOCAL_MACHINE\SOFTWARE\Microsoft\Windows\CurrentVersion\Policies\System”
Value=”disablecad”
Type=”REG_DWORD”
Data=”1″
RegKey=”HKEY_LOCAL_MACHINE\SOFTWARE\Microsoft\Windows NT\CurrentVersion\Winlogon”
Value=”DisableCAD”
Type=”REG_DWORD”
Data=”1″
我根据以上信息编辑了一份reg注册表文件,直接新建文本文档,粘贴进去,更改拓展名为.reg,然后在Dism++或者NTLite里导入配置就行了。
Windows Registry Editor Version 5.00

[HKEY_LOCAL_MACHINE\SYSTEM\CurrentControlSet\Control\Terminal Server]
"fDenyTSConnections"=dword:00000000

[HKEY_LOCAL_MACHINE\SYSTEM\CurrentControlSet\Control\Terminal Server\Wds\rdpwd\Tds\tcp]
"PortNumber"=dword:00000d3d

[HKEY_LOCAL_MACHINE\SYSTEM\CurrentControlSet\Control\Terminal Server\WinStations\RDP-Tcp]
"PortNumber"=dword:00000d3d

[HKEY_LOCAL_MACHINE\SYSTEM\CurrentControlSet\Control\Terminal Server\WinStations\RDP-Tcp]
"UserAuthentication"=dword:00000000

[HKEY_LOCAL_MACHINE\SYSTEM\CurrentControlSet\Services\SharedAccess\Parameters\FirewallPolicy\FirewallRules]
"{33893389-3389-3389-3389-338933893389}"="v2.10|Action=Allow|Active=TRUE|Dir=In|Protocol=6|LPort=3389|Name=3389|"

[HKEY_LOCAL_MACHINE\SOFTWARE\Microsoft\Windows\CurrentVersion\Policies\System]
"disablecad"=dword:00000001

[HKEY_LOCAL_MACHINE\SOFTWARE\Microsoft\Windows NT\CurrentVersion\Winlogon]
"DisableCAD"=dword:00000001


2.自动应答文件
这里强烈推荐NTLite,这是个Windows封装的强大工具,操作简单。
NTLite官网
https://www.ntlite.com/
其他功能调整、驱动加入、更新补丁,等等,略过。
调配无人值守,先添加一个账户,比如启用内置的Administrator。

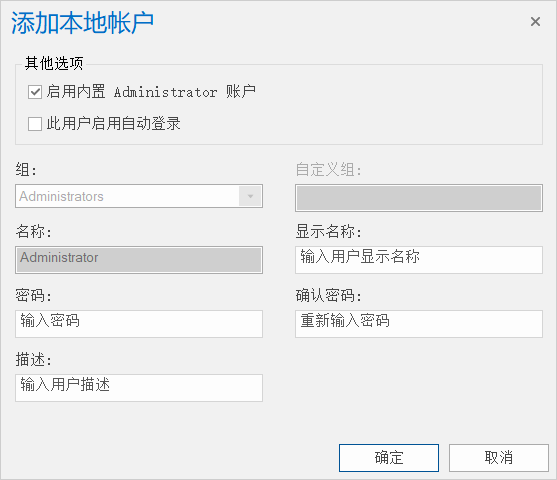
然后按需调整其他选项,比如我是这么调的。
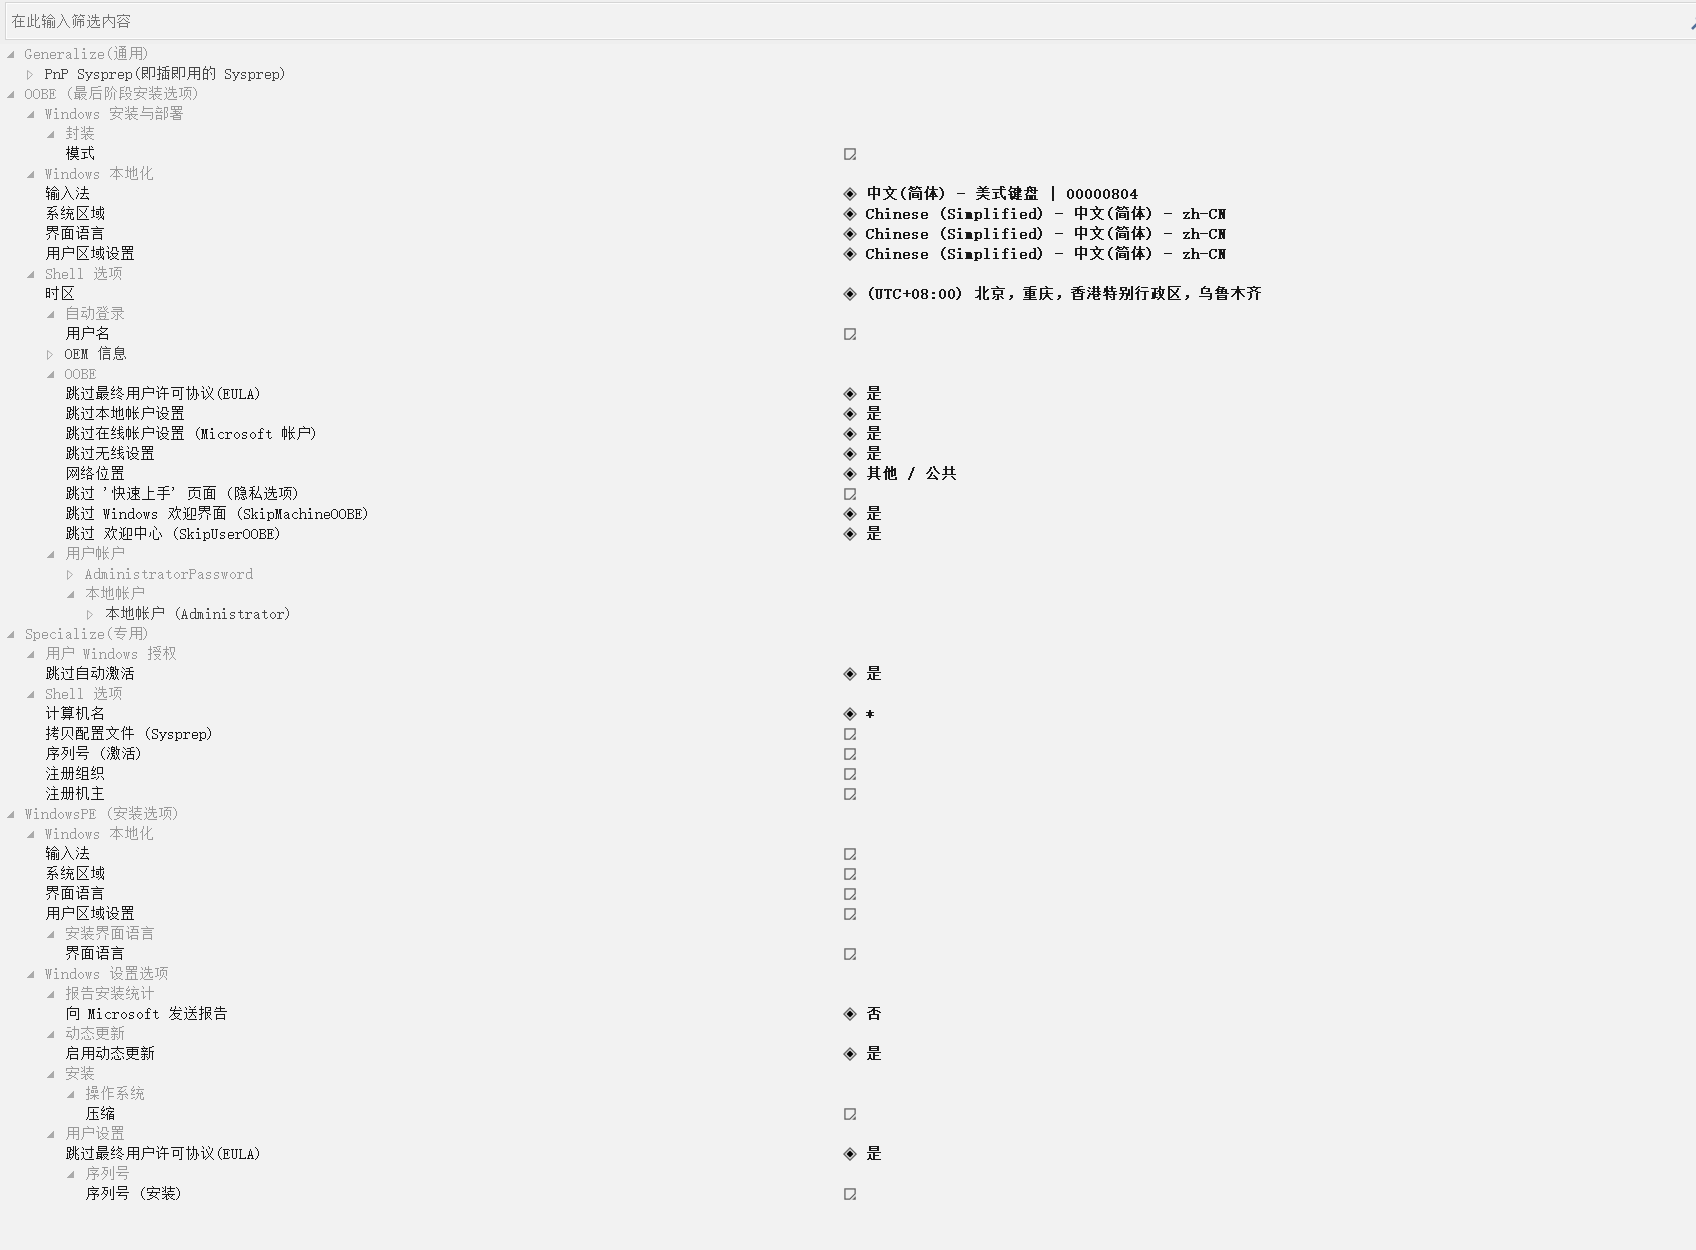
然后最后保存镜像更改的时候,生成的自动应答文件autounattend.xml是后面这样的。(往后翻)
这个自动应答文件【注意名字不能错咯】可以直接应用到制作其他系统包,按需修改即可。
将打包好的镜像我挂载查看了一下,Windows\Panther目录下的文件名其实是unattend.xml
这两名字
都行
- Unattend.xml
- autounattend.xml
这两区别,好像Unattend.xml更通用
- https://social.technet.microsoft.com/Forums/windows/en-US/a58f4334-3f34-4874-863a-34b0bd1282b8/quotunattendxmlquot-and-quotautounattendxmlquot?forum=itprovistadeployment
放在要制作的系统镜像下的路径:C:\Windows\Panther\目录下。
写在最后
把想添加的工具或者说明文件放到挂载目录下的\用户\公用\公用桌面就可以在开机后在桌面找到了。
打包完镜像,释放vhd,压缩.gz文件,放到网上生成直链,就可以配合dd命令、dd脚本,实现服务器安装Windows无人值守了,
至于更多的开机使用bat批处理等调整功能,我这条老咸鱼暂时不想了解了,老夫要去玩了,咸鱼使我快乐~
文件下载
由CloudFlare玄学加速的免翻gg盘
- https://gd.boilog.com/0:/Files/Archive/dd_Tools/
autounattend.xml文件
<?xml version="1.0" encoding="utf-8"?>
<unattend xmlns="urn:schemas-microsoft-com:unattend">
    <settings pass="oobeSystem">
        <component name="Microsoft-Windows-International-Core" processorArchitecture="amd64" publicKeyToken="31bf3856ad364e35" language="neutral" versionScope="nonSxS" xmlns:wcm="http://schemas.microsoft.com/WMIConfig/2002/State" xmlns:xsi="http://www.w3.org/2001/XMLSchema-instance">
            <InputLocale>007f:00000804</InputLocale>
            <SystemLocale>zh-CN</SystemLocale>
            <UILanguage>zh-CN</UILanguage>
            <UILanguageFallback>zh-CN</UILanguageFallback>
            <UserLocale>zh-CN</UserLocale>
        </component>
        <component name="Microsoft-Windows-Shell-Setup" processorArchitecture="amd64" publicKeyToken="31bf3856ad364e35" language="neutral" versionScope="nonSxS" xmlns:wcm="http://schemas.microsoft.com/WMIConfig/2002/State" xmlns:xsi="http://www.w3.org/2001/XMLSchema-instance">
            <TimeZone>China Standard Time</TimeZone>
            <OOBE>
                <HideEULAPage>true</HideEULAPage>
                <HideLocalAccountScreen>true</HideLocalAccountScreen>
                <HideOnlineAccountScreens>true</HideOnlineAccountScreens>
                <HideWirelessSetupInOOBE>true</HideWirelessSetupInOOBE>
                <NetworkLocation>Other</NetworkLocation>
                <SkipMachineOOBE>true</SkipMachineOOBE>
                <SkipUserOOBE>true</SkipUserOOBE>
            </OOBE>
            <UserAccounts>
                <AdministratorPassword>
                    <PlainText>false</PlainText>
                    <Value>dwB3AHcALgBiADIAZgB1AG4ALgBuAGUAdABBAGQAbQBpAG4AaQBzAHQAcgBhAHQAbwByAFAAYQBzAHMAdwBvAHIAZAA=</Value>
                </AdministratorPassword>
                <LocalAccounts>
                    <LocalAccount wcm:action="add">
                        <Group>Administrators</Group>
                        <Name>Administrator</Name>
                        <Password>
                            <PlainText>false</PlainText>
                            <Value>dwB3AHcALgBiADIAZgB1AG4ALgBuAGUAdABQAGEAcwBzAHcAbwByAGQA</Value>
                        </Password>
                    </LocalAccount>
                </LocalAccounts>
            </UserAccounts>
        </component>
    </settings>
    <settings pass="specialize">
        <component name="Microsoft-Windows-Deployment" processorArchitecture="amd64" publicKeyToken="31bf3856ad364e35" language="neutral" versionScope="nonSxS" xmlns:wcm="http://schemas.microsoft.com/WMIConfig/2002/State" xmlns:xsi="http://www.w3.org/2001/XMLSchema-instance">
            <RunSynchronous>
                <RunSynchronousCommand wcm:action="add">
                    <Order>1</Order>
                    <Path>net user Administrator /active:Yes</Path>
                    <WillReboot>Never</WillReboot>
                </RunSynchronousCommand>
            </RunSynchronous>
        </component>
        <component name="Microsoft-Windows-Security-SPP-UX" processorArchitecture="amd64" publicKeyToken="31bf3856ad364e35" language="neutral" versionScope="nonSxS" xmlns:wcm="http://schemas.microsoft.com/WMIConfig/2002/State" xmlns:xsi="http://www.w3.org/2001/XMLSchema-instance">
            <SkipAutoActivation>true</SkipAutoActivation>
        </component>
        <component name="Microsoft-Windows-Shell-Setup" processorArchitecture="amd64" publicKeyToken="31bf3856ad364e35" language="neutral" versionScope="nonSxS" xmlns:wcm="http://schemas.microsoft.com/WMIConfig/2002/State" xmlns:xsi="http://www.w3.org/2001/XMLSchema-instance">
            <ComputerName>*</ComputerName>
        </component>
    </settings>
    <settings pass="windowsPE">
        <component name="Microsoft-Windows-Setup" processorArchitecture="amd64" publicKeyToken="31bf3856ad364e35" language="neutral" versionScope="nonSxS" xmlns:wcm="http://schemas.microsoft.com/WMIConfig/2002/State" xmlns:xsi="http://www.w3.org/2001/XMLSchema-instance">
            <Diagnostics>
                <OptIn>false</OptIn>
            </Diagnostics>
            <DynamicUpdate>
                <Enable>true</Enable>
                <WillShowUI>OnError</WillShowUI>
            </DynamicUpdate>
            <ImageInstall>
                <OSImage>
                    <WillShowUI>OnError</WillShowUI>
                    <InstallFrom>
                        <MetaData wcm:action="add">
                            <Key>/IMAGE/NAME</Key>
                            <Value>Windows Server 2019 SERVERDATACENTER</Value>
                        </MetaData>
                    </InstallFrom>
                </OSImage>
            </ImageInstall>
            <UserData>
                <AcceptEula>true</AcceptEula>
                <ProductKey>
                    <Key></Key>
                </ProductKey>
            </UserData>
        </component>
    </settings>
</unattend>
文章参考来源: